Every mum you know has probably told you that you’ll regret not using a baby carrier. And you’ve likely heard or seen terms online like carrier, ring sling and infant wrap. But as a new mum, these terms, and baby gear in general, can be really confusing.
In this post, we go over why you’d want a baby wrap, how to tie a baby wrap and tips for tying and using a baby wrap.
Pros and Cons of Baby Wrap Carriers
If you can’t seem to make any big, or slightly big, decisions without drafting up a Rory Gilmore-style pro-con list. Here’s yours for a baby wrap carrier.
Pros
- Multiple carry positions
- Offers more control over a snug fit
- Provides a close nurturing environment
- Great for skin-to-skin and bonding time with newborns
- Oftentimes provides a near-instant calming effect for fussy babies, helping them relax and fall asleep
- Easy to take your little one out of the baby wrap to feed or for diaper changes
- Napping and nursing-friendly
- Cheaper than a soft-structured baby carrier
- Comes in stretchy or woven fabrics, most of which are lightweight, breathable and machine washable
- Comfortably fits different sizes of mums, dads, grandparents, etc. (you just wrap it around your waist until you get the perfect fit)
- Ideal for those early postpartum days (pro-tip: just put it on in the morning and leave it on all day. Take baby in and out of the wrap, rather than taking the wrap on and off! Tie it once during the day. Makes it so much easier! You’re in your yoga pants anyway during those early days!)
- Gender neutral (yes, dads can use baby wraps, too)
- You can basically move around, hands-free, like you normally would while still bonding with your new baby; just nothing too active.
Cons
- Takes a handful of tries to get the wrapping technique nailed down
- Isn’t the most convenient for older babies who weigh more and are active and curious about the world around them.
How to Tie a Baby Wrap
Compared to soft-structured baby carriers (ones with padded straps and a waist belt) or even a ring sling (long, rectangular piece of cloth with two rings sewn into an end), baby wrap carriers (a long piece of rectangular fabric wrapped entirely around the caregiver’s and baby’s bodies and tied to secure it) typically take a little more time and practice to get used to correctly tying for first-time baby wrap users. But once you get the hang of it, tying a wrap will become second nature to you.

While you can use different carrying positions with most baby wraps: front inward facing, hip carry and back carry for example—the most common position is the front inward facing carry, especially for newborns. Below are step-by-step instructions for how to tie a baby wrap in this classic carry position.
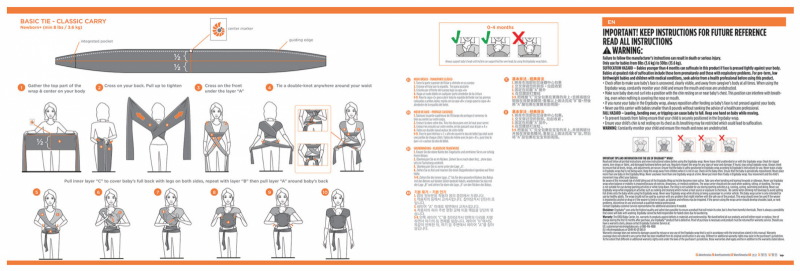
Front Inward Facing Carry Instructions

- Unfold the wrap and find the centre of it.
- Place the center of the wrap on your body (across or just under your chest) and gather the top half of the fabric.
- While holding the wrap, cross your hands behind your back and then pull them up to tighten the wrap and over your shoulders. This should form an “X” across your back.
- Gather the fabric, tuck it through the top half of the fabric that’s around the center on the front of your body and then cross it in front of you down by your waist. You should now have an “X” high on your chest. The higher the “X”, the higher on your chest your baby will sit.
- Tie the baby wrap around your waist in a double knot. You can tie it in the front, on your side or behind your back, wherever you feel most comfortable. Depending on your size and length of the fabric, you might wrap it around your waist once or a couple of times.
- Check the front to make sure you left enough space for your baby, about 6-8 inches. Also, check the neckline to make sure it’s in the right place and that the fabric feels secure and comfortable over your shoulders.
- Now it’s time to pick up your baby!
- Lay your baby, who’s facing you, against you over your side and shoulder that’s opposite of the wrap’s inside panel (the one closest to your body). Put his leg in through the inside panel first and then his other leg in through the other panel, or outside panel.
- You now have an X-seated position for your baby, and you’re going to pull the inside panel over his back so it’s all the way across, knee to knee, on the bottom. His back, bottom and thighs should be covered by the inside panel.
- Now repeat step 10 with the outside panel. After both panels are pulled across his back, double check that he is sitting ergonomically in an M-shape position.
- Take both of baby’s legs and put them through that outside, horizontal panel (the one across your body that you pushed down earlier) and pull it up all the way until it’s under baby’s neck.
- Lastly, tuck the bottom under his knees to make sure he’s still in the M-position and that your baby is comfortably and safely inside the wrap.
This easy-to-follow video visually guides you through these steps so you can watch to make sure you’re correctly tying your Ergobaby Aura Baby Wrap.
As your baby gets older, you can try out the other baby wrap carry positions. Hip carry is best for babies who are around 5-6 months old and older who have good head and neck control. The back carry with a baby wrap is not a recommended carry position for infant wrap use because the infant’s head and neck wouldn’t be supported. It’s best to try out the back carry when your child is around 1 year old and has great head, neck and upper body control. Or better yet, use a soft-structured carrier that’s made for safe, supportive back carrying.
Tips for Tying and Using a Baby Wrap
Now that you know how to tie a baby wrap, here are some tips so you can know for sure that you and your baby will be safe and comfortable while using a baby wrap:
- Make sure the wrap is snug and comfortable for both of you. If the wrap doesn’t feel right, do three things: 1) Undo the wrap (without your baby in it) and tighten it. 2) Make sure the straps across your back are in a flat “X” position. 3) Be sure the “X” on your back is in the center of your back or up a little higher if you’re carrying a bigger baby.
- Make sure you have the right size. A question you might have when looking at baby wraps is, “What size of baby wrap do I need?” If you’re looking at a woven wrap, they come in basic sizes of size 1 up to size 8. Determining what size of baby wrap you need depends on the type of carries you plan to do, the fabric’s blend or thickness, what size you are and the size of your baby. But with other wraps, like the Aura Baby Wrap, you don’t have to worry about sizing. The Aura is a one size wrap that fits petite to plus-size wearers.
- Check and see if you can fit two fingers underneath your baby’s chin. Her chin needs to be up off her chest so her airways remain open to breathe.
- Always check that you can see your baby’s face. Whether your baby is awake, asleep or nursing, and even if your wrap is made of lightweight fabric, you don’t want her face smashed against your body or any fabric over their face. Gently turn your baby’s face to one side so it’s not pressed against you and move the fabric so it’s positioned off their face every time they are in the wrap.
- Make sure your baby’s head, neck and back are totally supported with the wrap.
- Baby should be close against your body, not leaning away from you, with her back in a “C” position and her legs in an “M’ position.
- Baby should be high enough on your chest that you can lean down and kiss the top of their head.
- Remember it may take a minute or a few tries before your baby likes or feels comfortable in the wrap. So if your baby is fussy when you put them in, do your best to soothe them by softly bouncing, rocking back and forth, rubbing their back and/or quietly talking, and be kind and give yourself and baby enough time to get used to it.

